[Vue3, Teleport] Teleport를 사용해 모달 만들기
📌 Teleport의 필요성
vue를 사용해 서비스를 구현할 때에는 컴포넌트라는 단위로 화면을 구성하게 됩니다. 설계에 따라서 수 많은 컴포넌트들이 사용되고, 이 컴포넌트들은 논리적인 트리 구조를 갖게 됩니다.
그리고 vue는 우리가 작성한 컴포넌트 구조를 바탕으로 DOM tree를 구성하게 됩니다. 따라서 구조상 하위에 있는 컴포넌트는 자신보다 상위의 컴포넌트나 형제 컴포넌트에 접근해 간단한 상호작용이 상당히 까다롭습니다. event bus, vuex 또는 소위 props drilling이라 불리는 구조에 따라 줄줄이 props를 전달해야 하는 상황에 직면하게 됩니다.
Teleport는 컴포넌트 트리 구조와 관계 없이 자신이 원하는 DOM 위치에서 렌더링을 하고, 조작할 수 있는 기술입니다. react에서는 portal이라는 단어로 표현됩니다. teleport와 portal 모두 표현하고자 하는 의미가 비슷합니다.
간단한 모달을 만들어 vue에서 portal을 사용하는 방법을 알아보도록 하겠습니다.
아래에서 사용한 코드는 모두 제 github에서 보실 수 있습니다.
⚙️ 개발 환경
@vue/cli@5.0.8 를 사용해 생성한 프로젝트입니다.
- vue version: ^3.2.13
- composition API 사용
- Typescript 사용
📌 Teleport를 사용해 모달 만들기
1. index.html에 teleport 목적지 element 생성
teleport를 사용해 하위의 자식 컴포넌트에서 간단한 모달을 띄워보도록 하겠습니다. 우선 우리가 생성할 모달을 렌더링해줄 element를 생성해야 합니다. 최상단에 fullsreen 모달을 띄우기 위해서 vue 인스턴스가 렌더링되는 #app 옆에 나란히 element를 생성합니다.
index.html
// index.html
  <!--  ...-->
  <body>
    <div id="app"></div>
	<!-- teleport는 여기 달라 붙습니다!-->
    <div id="modal-destination"></div>
  </body>
</html>
2. 필요 컴포넌트 생성
컴포넌트 구조는 최대한 단순화해서 아래와 같이 구성하도록 하겠습니다. ChildComp 에서 MyModal 컴포넌트를 갖고 있습니다. MyModal 컴포넌트는 위에 작성한 element에 붙어 렌더링되도록 구현하겠습니다.
가독성을 위해 <style> 는 제외하고 작성하도록 하겠습니다. style을 포함한 코드는 github에 있습니다.
🚨 아래 트리는 vue 개발자 도구에서 보이는 컴포넌트 구조입니다. 실제 프로젝트 구조가 아닙니다!
📦 App
└─ ParentComp
   └─ ChildComp
      └─ MyModal
ChildComp.vue
// ChildComp.vue
<template>
  <div class="child">
    <h2>자식 컴포넌트</h2>
    <button @click="isOpenModal = true">Modal</button>
  </div>
  <MyModal
    :is-open-modal="isOpenModal"
    title="타이틀"
    @close="isOpenModal = false"
  >
    <template #content>
      <div>테스트 모달입니다.</div>
    </template>
  </MyModal>
</template>

<script setup lang="ts">
import { ref } from "vue";
import MyModal from "@/components/MyModal.vue";

const isOpenModal = ref<boolean>(false);
</script>
ParentComp 하위에 위치할 자식 컴포넌트입니다.
이 ChildComp 컴포넌트는 isOpenModal 이라는 state로 모달의 렌더링 상태를 제어합니다.
MyModal 컴포넌트를 자식으로 갖고 있으며, MyModal 컴포넌트에게 isOpenModal 데이터를 props로 물려주게 됩니다.
그리고 MyModal의 범용성을 위해 title 을 추가로 넘겨주고, slot을 통해 모달에 표현할 데이터도 넘겨줍니다.
MyModal 에서는 isOpenModal, title 이라는 props를 받아줘야 하고, slot을 통해 모달 내용이 표현되도록 처리해야 합니다.
MyModal.vue
// MyModal.vue
<template>
<Teleport to="#modal-destination">
<div v-if="isOpenModal" class="modal-container">
<div>
<div class="header">
<h3>
</h3>
<span @click="emit('close')">×</span>
</div>
<div class="body">
<slot name="content"></slot>
</div>
</div>
</div>
</Teleport>
</template>
<script setup lang="ts">
import { defineProps, defineEmits } from "vue";
const props = defineProps<{
isOpenModal: boolean;
title: string;
}>();
const emit = defineEmits<{
(e: "close"): void;
}>();
</script>
드디어 Teleport 를 사용하는 MyModal 컴포넌트입니다.
<template> 가장 상단에서 <Teleport> 컴포넌트를 선언합니다. to 속성으로 index.html에서 만든 element의 선택자를 작성합니다. 이를 통해 Teleport가 감싸고 있는 컴포넌트 및 엘레먼트는 index.html 의 modal-destination이라는 id를 가진 <div>에 렌더링되게 됩니다.
MyModal 컴포넌트를 범용적으로 사용하기 위해 title을 props로, content를 slot으로 받아줄 수 있도록 구현합니다.
추가로 자신을 사용하는 컴포넌트에서 isOpenModal 을 비활성화하도록 close 이벤트를 발행합니다.
ParentComp.vue
컴포넌트 구조를 보다 깊게 가져가기 위해서 작성한 컴포넌트입니다. 단순히 ChildComp 컴포넌트만 갖고 있습니다.
// ParentComp.vue
<template>
  <div class="parent">
    <h2>부모 컴포넌트</h2>
    <ChildComp></ChildComp>
  </div>
</template>

<script setup lang="ts">
import ChildComp from "@/components/ChildComp";
</script>
렌더링 확인

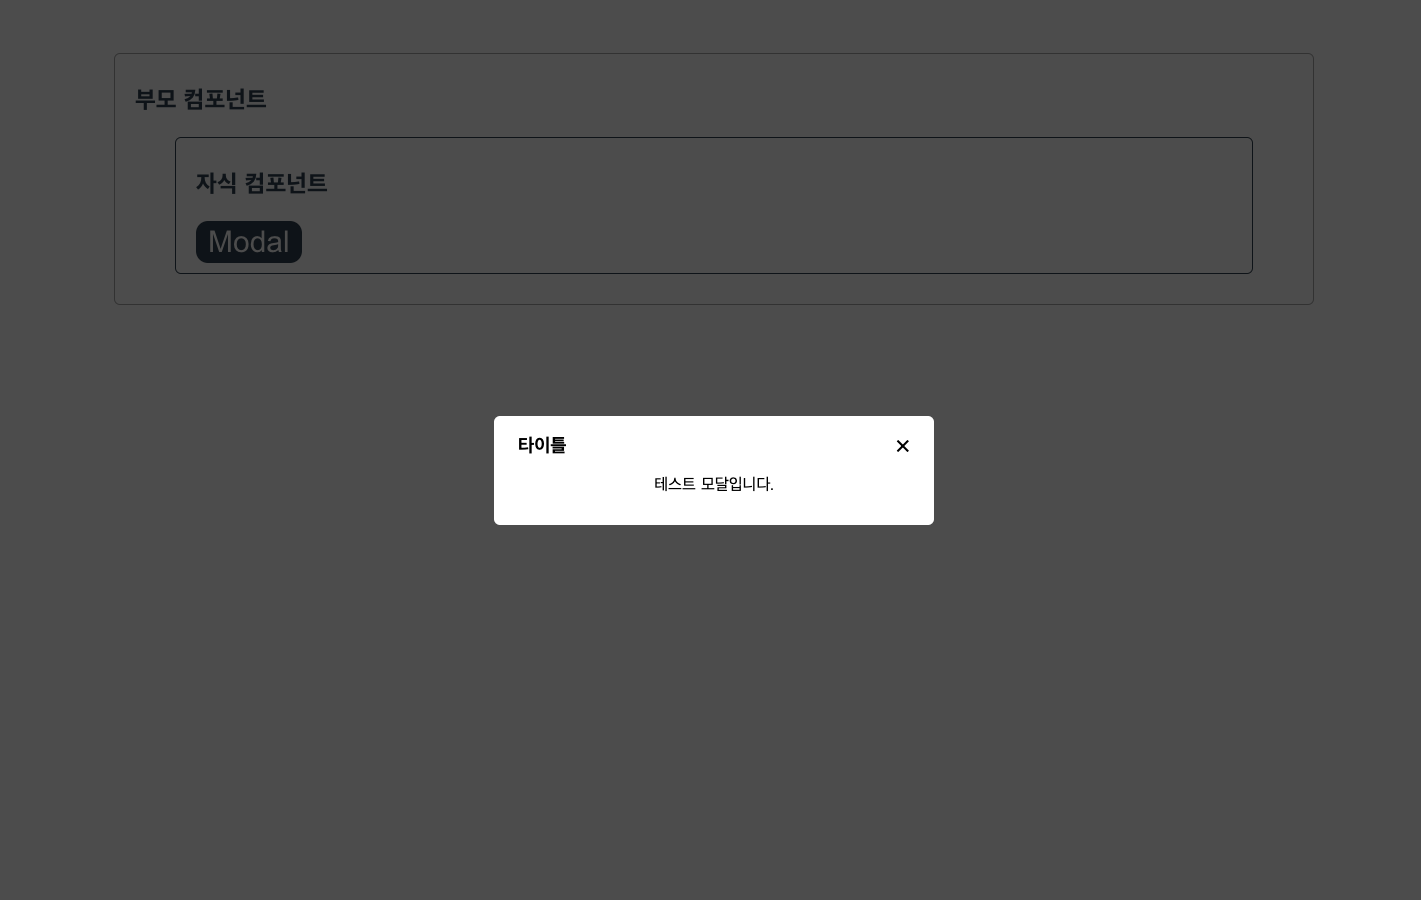
위에서 ChildComp의 Modal 버튼을 클릭하면, 모달이 표현되도록 구현하였습니다.

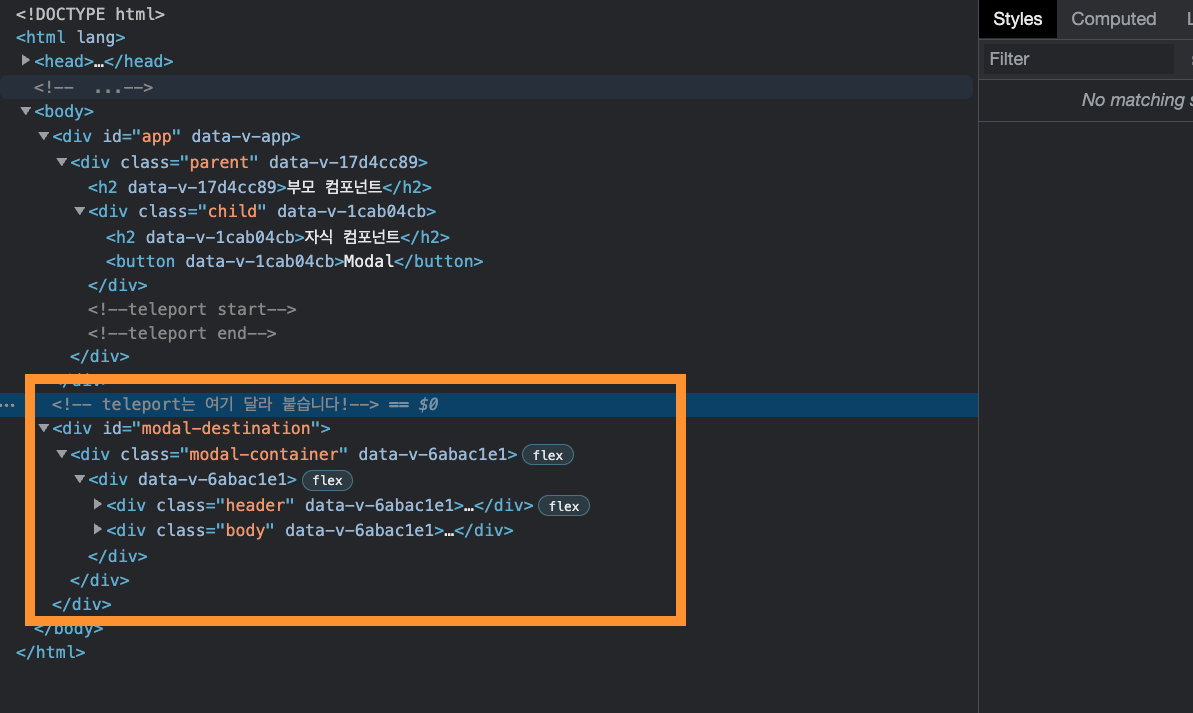
vue 개발자 도구로 컴포넌트 구조를 보면, Teleport를 사용한 MyModal은 여전히 ChildComp 아래에 위치합니다.

하지만, 실제 DOM tree를 보게되면, 의도한대로 MyModal <Teleport> 에 작성한 엘레먼트들이 modal-destination id를 가진 <div> 에 위치하는 것을 확인할 수 있습니다.
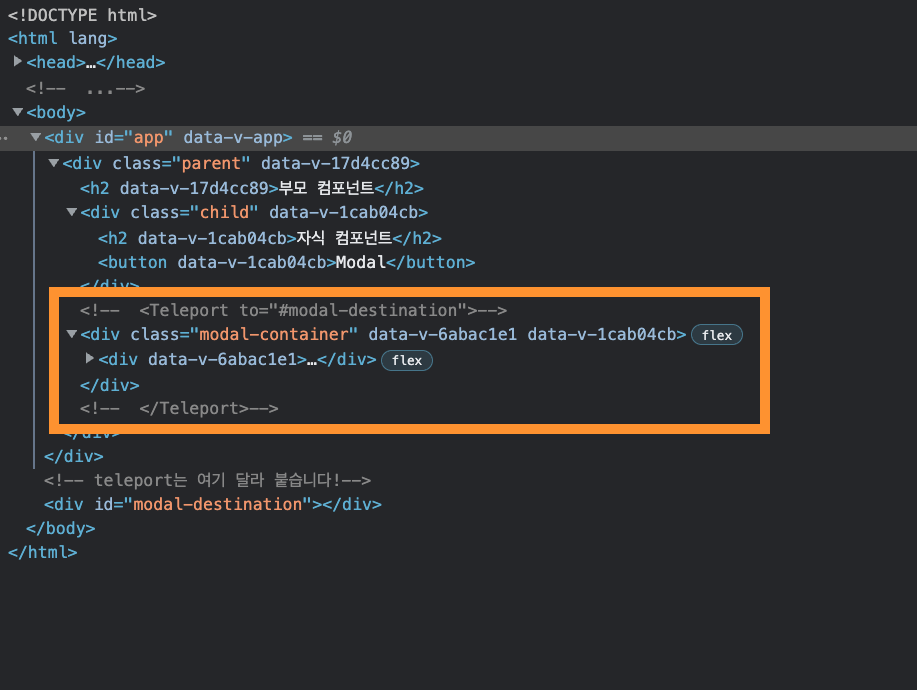
MyModal의 <Teleport>를 주석처리하고 DOM tree를 확인하도록 하겠습니다.
// MyModal.vue
<template>
<!-- <Teleport to="#modal-destination">-->
<div v-if="isOpenModal" class="modal-container">
<div>
<div class="header">
<h3>
</h3>
<span @click="emit('close')">×</span>
</div>
<div class="body">
<slot name="content"></slot>
</div>
</div>
</div>
<!-- </Teleport>-->
</template>
<Teleport>를 주석 처리한 후에 다시 확인을 해보면, 아래 modal-destination이 아닌, ChildComp 하단에 위치한 것을 알 수 있습니다.

📌 결론
간단한 모달을 생성해 vue의 Teleport에 대해 알아보았습니다. 최근 사내에 이와 같은 문제로 하위 컴포넌트에서 호출하는 모달이 렌더링되지 않는 결함이 있었습니다. 사내 환경은 vue2를 사용하고 있기 때문에, Teleport로 해결할 수 없지만, 이번 기회를 통해 접근하는 방법에 대해서 다시 생각해볼 수 있는 기회였습니다.

Leave a comment